Thursday, December 11, 2014

Taking Long Exposures

It seems to me that we live in a world orientated to a digital generation demanding instant gratification. This extends to photography, encouraged by the prevalence of camera phones and Instagram type apps. How many photographers, when they come across a beautiful scene, just stop and snap a photo with a camera phone and then move on?
Long exposure photography is different. It demands patience, an appreciation of beautiful light and a deep understanding of composition. It is as much about the mind-set of the photographer as it is about the subject. It’s not brash or flashy – you rarely see long exposure photographers use techniques such as high dynamic range (HDR) photography or adding texture layers.
What is long exposure photography? There is no precise definition. I think of it as involving shutter speeds of ten seconds or longer, but I’m sure some photographers will be thinking in terms of shutter speeds of a minute or more. But the aim is the same – to create beautiful and surreal images by leaving the shutter open long enough to record anything that moves within the landscape, such as water, as a blur.
That’s why most long exposure photography tends to take place along the coast or near moving water. It creates an interesting subject, helped by natural features such as rocks and islands, and man-made ones like piers and jetties.
Painting with light is also a form of long exposure photography.


Tuesday, December 2, 2014

It's all about the focus, learn it and apply it !

All pictures of people soar when you focus in on your subject’s eyes, and that’s no different with Christmas photos. It’s critical to compose the image with as little headroom and dead space on the sides as possible, so the image is more about the faces and the eyes than anything else. The rest of the décor will filter into the image on its own. In our photographs, always try and nail the eyes to be on the same plane, and this is effective for this kind of photo as it shows a subtle unity among family or group shots. 
You should always use a flash with most indoor Christmas photos, but use a detachable flash (or an angled flash) and bounce the light off the ceiling or walls and don't be afraid to review your picture and then re set it. Remember, the ambient light levels will be raised by the Christmas lights (and possibly candles too), and you don’t want the vibrant colors washed out by the flash. And as always, don't miss those special moments and get in the picture yourself if it's your family picture, have a tripod handy and a remote trigger and don't take just one as kids can be the hardest to capture the right expression and the eyes.

Steve
Dance Media Ltd

Thursday, May 22, 2014

We've all seen these shooters !

Just read on Facebook the other day how the social networking site has suddenly turned into a magazine – poets, writers and photographers after every few posts. While it is a great thing to share your creativity with everyone, some people just do not know where to stop. For instance, budding photographers who, no matter their age or location, always do these 11 annoying things on Facebook.

1.Tag 50 people in one photo to get likes and comments.

So you get a notification about being tagged in your friend’s photo – and you click on it to find dozens of other people being tagged in it too, which is essentially some random shot of a bird or flowers or something equally lame. You give one sympathy like, untag yourself and move on. This is a warning sign that your friend is going to go into the amateur photographer mode soon.

2.Create a “XYZ Photography” page on Facebook.

The most common annoying thing photographers on Facebook do is to create a photography page in their own name on Facebook. Even if they had probably just started out fresh and taken up the art as a hobby. With 50 average pictures in their computer to boast of. Sigh! Or they stand in a room full of people and can't stop shutter bugging, literally by taking a rapid fire barrage approach of 10 pics and just maybe their hoping for 1 decent one of each person.

3.Hound every person they know to like the page.

This is the most annoying part of having an amateur photographer for a friend. It does not matter if you guys have not spoken in years, they are going to pop up on your chat and be like, “Hey! What’s up? Please like my page “Douchebag Photography”… thanks! : - )” And they are not going to rest till you do it. So just get it done and over with!

4.Hound every person they know to tell their friends to like the page.

The next level of douchebaggery comes with them getting in touch with you once again. You’ve already ‘liked’ their page, but no – that’s not enough. Could you also please-pretty-please spread the word to the people in your friend list too? Of course, why not? Why don’t you effing pay me a salary for being your public relations officer?

5.Create a fancy watermark and post it on every picture.

Because they are so effing brilliant, magazines and other photographers are dying to get their hands on these works of art. At least that’s what these shutterbugs think. How to avoid such theft? Put more effort into creating a watermark than they do in mastering their photography skills – and paste them on every effing photo. The least it does is give these poor souls a sense of achievement.

6.Upload at least one ‘artistic’ selfie for a profile picture.

Every wannabe photographer has at least one profile picture they have taken of themselves – a DSLR selfie, if you must. This is to do two things – one, show the world that they have a fancy camera, and secondly, show the world that they can use it to take their own pictures too!

7.Think that pictures of poor/old people in black and white are the epitome of great photography.

Amateur Photography Lesson 101: If you have not taken high contrast photos of tired, wrinkled and depressed old/poor people in black and white, you have not done anything worthwhile with your expensive camera. Every wannabe shutterbug will have at least one photo of such a subject in their extensive albums.

8.Think that macro is just the bee’s knees. Literally.

Amateur Photography Lesson 102: Macro the shit out of all the bugs in and around your location. Butterflies, caterpillars, bees – any and every insect become subjects of this budding lensman’s camera. If bugs could talk, they’d probably be saying…

9.Edit the shit out of the simplest pictures.

Amateur Photography Lesson 103: Take a picture, Photoshop it till it barely looks like the original and take all the credit for some amazing photography skills. What is up with THAT? They really need to calm down and go easy with the editing tools.

10.Overthink their captions.

So you take a picture of a line of ants scurrying away – and give a 300 word exposition on hard work and discipline as the caption? Really? They are ants – taking their food back to their anthill. That’s it. Don’t overthink it – it comes off as incredibly pretentious, dude.

11.   Flood your newsfeed with pictures.

Remember #2 and #3? This will lead to a chain reaction – and before you know it, your newsfeed is flooded with photos of the aforementioned “Douchebag Photography” that you were not even interested in to begin with. Open your Facebook and you are like –

The remedy? Unlike their page, unfriend them, block them – or do something more permanent than that… to their precious camera.

Saturday, April 5, 2014

The Head Shot, using your shoulders to control the image

When taking head shot and upper body portraits of people one simple posing tip that I’ve picked up is to angle the shoulders of your subject rather than to have them even or squared in your shot.
While the shoulders might not seem like an important aspect of a portrait they can actually set the tone for an image as they’re the widest part of your subject and they are visually what the main point of focus for your image (the head) is sitting upon.
Generally speaking, angling the shoulders slightly gives you shot balance and helps lead your viewer’s eye into the shot towards your main focal point. It also stops your subject seeming out of proportion as it lessons the width of the shoulders slightly.
Follow & Like our Facebook
Getting this effect might mean actually getting your subject to lean in one direction or another or it could simply mean getting them to turn their body a little so you’re not photographing them directly front on. Another technique can be to frame your subject slightly off center so that one shoulder is actually out of the frame.
Some believe that in positioning your subjects shoulders make the one closest to camera the lower of the two – but I’ve found that you can get an interesting effect by doing it the other way around too.
Of course – this isn’t a hard and fast rule and sometimes the completely front on symmetrical shot can leave a shot can have a very powerful (and often confronting) impact upon your readers also. So as always – experiment with posing your subject in a variety of ways and see what works best for you and your subject.

Tuesday, April 1, 2014

Practice and prepare the same shot multiple times and see what happens

Jim Harmer of ImprovePhotography.com
Dance Media shared this amazing article:Visit DanceMedia.org for more
Athletes would never consider showing up to a game without having practiced, so why is it that most photographers shoot for the “wall-hanger” photo every time they go out without ever practicing new techniques? Consider applying these new workouts in your photography routine and you will improve your skills and creativity.

1. The EXIF Drilldown

bayfrontNight_MG_2559.jpgIn my photography workshops, I often show my portfolio to introduce myself before the class begins. After showing a few pictures, someone will inevitably raise their hand and ask, “How did you shoot that one?” I tell them the answer, but then I show them how to practice guessing camera settings so they will know what to use in any situation.
The very best way to shoot like a pro is to analyse the work of the pros, and Flickr is just the place to look. Most photographers probably know that cameras save information about what camera settings were used to take a photo, and the information is saved in the jpeg image file. Some websites, such as Flickr, make this information easily viewable so photographers can see how other photographers created a photo.
To view this information on Flickr, find a photo and click the small text link on the top right of the screen that reads the name of the camera that shot the picture. Clicking this link will bring up a new page showing all of the camera settings the photographer used.
This photography workout simply requires going to Flickr or any other photo sharing website, finding good photos, and then carefully reviewing the EXIF data from the pictures. Ask intrinsically why the photographer chose those settings and what camera settings could change in order to improve the photograph.
When this photography exercise is implemented, the question, “How did he take that picture?” is asked much less often. With practice, knowing the correct camera settings is easy.

2. One Shot

cabin.jpg
Most photographers take tens of thousands of pictures over the course of a year, but only a handful of those photos really stand out enough to make their way to your portfolio of best images. Many good images may be captured during each time shooting, but rarely is an image captured that is truly stunning.
While all photographers understand this fact, their photography techniques rarely reflect it. Most photographers shoot hundreds of images and hope that some of them reach the level of quality necessary to make it into the portfolio.
Though this method of never missing the moment has some merit, it also teaches photographers that if the first or second photo of a scene does not turn out, it is acceptable to simply forgive and forget the mistakes and move on to something else. Therefore, this straight-forward exercise is designed to work that bad habit out of photographers: Go out and shoot, but do not return home with more than one photo. Click the shutter more times, yes, but delete each photo if it is not perfect.
Implementing this photography workout will teach photographers not to give up on a shot until it is perfect.

3. Ten Shots, One Subject

owl.jpg
This workout works almost the opposite of the second exercise, but it has a similar purpose—keep shooting to capture the perfect shot.
To practice this technique, find one subject and work to capture ten photos of that same subject before leaving. I recognized the need for this exercise while teaching my photography students landscape photography in Naples, Florida. We went to shoot the famous Naples Fishing Pier, but, not to my surprise, all of the students set up their tripods at the exact same spot immediately upon arriving at the beach. Their photo included all of the pier and the sunset behind it. This was a perfectly reasonable composition, but the students had a difficult time thinking of new ways to photograph the pier in an interesting way.
I asked the students to all take 10 different shots of the pier. They struggled at first, but eventually ended up with beautiful photos. They photographed tiny details on the pier, captured photos of the water splashing up against the pier pilings, and shot the pier as a silhouette against the sunset. Soon the students discovered their initial photo of the subject was not quite as strong as the photos they took as they forced themselves to try new things.
When something captures your eye, don’t leave until you have shot that same subject in ten different ways.
As you practice your photography skills rather than simply shooting and hoping to improve, you will feel more confident in your ability to come out of any shoot with creative and technically-correct photos.

Saturday, February 22, 2014

Camera Flash Blow Out-How to avoid it !


How To Avoid Flash Blowout
Flash blowout is an inevitable problem for anyone with a basic point-and-shoot or entry model digital SLR. Because you don’t have many settings that allow you to control the intensity of the flash coming out of your camera, the flash is oftentimes too bright for the situation you are trying to photograph. Add in the fact that many point-and-shoot models don’t allow you to zoom in that far, and you end up too close to your subjects to reduce the effect of your flash.

So what’s a budding photographer supposed to do? The following tips won’t make flash photography as easy as owning a professional setup, but they will help you innovate in tricky situations. Try these out and see if you can’t beat the flash blowout blues once and for all.

Zoom In And Crop Your Photos

There’s a reason your images are too bright. You’re too close to your subject. I know you need to get close to your subject to fill the frame (you’ve been paying attention, haven’t you?), but it gets to be problem when your camera’s flash destroys the image. Here’s what you need to do.
Take a few steps away from your subject and zoom in as much as you can. Try to fill the frame with your subject’s face, but realize that you will probably have to do some cropping in Photoshop or another paint program later on. That’s fine because most new point-and-shoot cameras have plenty of megapixels for resolution. You should be able to do quite a bit of cropping without losing any of the important details.

Try To Adjust The Settings On Your Flash

Some point-and-shoot cameras and digital SLRs will allow you to make some small adjustments to the intensity of your flash. Go ahead and play with these, trying to reduce the flash as much as possible. The basic idea is this. The more you can reduce your flash, the closer you can get to your subjects without destroying your colors and turning everything white.

If You Can, Try To Increase The Light Nearby

Just turning a few lights on can stop flash blowout in its tracks. You won’t have to stand nearly as close to your subjects to get the flash to work properly. Just try to reposition your subject somewhere near a bright source of light. You can then use your flash as it was properly intended – to eliminate unwanted shadows and improve the overall lighting in the situation.
The following goes without saying, but it’s important to mention anyway. Always be courteous when you want to turn on a few light at someone else’s house. Not everybody is as keen on this as you might be. Get permission, use the lights for a little while, and then turn them off so everyone can enjoy the party.

Experiment With Bouncing Your Flash Off Of Some White Cards Or Mirrors

Not too many people know about this, but it can produce some pretty professional looking results. Instead of simply aiming your flash directly at your subjects, bring along a white card and try to bounce your onboard flash off of it. This dampens the flash, spreads it out, and makes your subjects look like they are being photographed in a more natural light.
I’ve found that this works best when I am in a corner and my subjects are directly in front of me. The corner reflects the light very efficiently, producing an even illumination all around. Of course, all of this requires practice, and no two corners are alike. Differently colored walls return different kinds of light when you bounce a flash off of them. It pays to spend some time experimenting before you go to the party.

Diffuse Your Flash

It also helps to spread out your flash and make it less intense by using a semi-transparent white material that you place in front of it. A surprising variety of materials will work just fine. One of my favorites is a single square of toilet paper. Just place it over your flash and watch the magic. The light from your flash will look much more natural.
There’s another thing I like about this approach. You can vary the intensity of your flash by using thinner or thicker materials for your diffuser. Try a paper towel instead of using a toilet paper square. Try two toilet paper squares stacked on top of one another. Experimentation will only lead to better photographs. It’s like I always say. If you can’t control your flash from the inside, control it from the outside!
I can’t wait to see a huge improvement in your night time photos. Send a few of them my way, and tell me which tricks you used to get them to turn out. If any of you are experimenting with bouncing your flash or using different diffusers, let me know about them.
www.dancemedia.org Dance Media

Saturday, February 1, 2014

Photographers / Videographers are kinda Car Dealerships !

Photoshoots are kind of like cars.
Photographers are kind of like car dealerships.
People often want me to take their photos for cheap, thinking it will look like the expensive photos I take.
They think I just sell cars and that all cars are the same.
But sometimes I sell Ferrari and sometimes I sell Honda's.
My ferrari has room in the budget for:
• Me, my eye, my time, my talent
• My gear and equipment
• A talented hair/makeup artist
• Props to build sets along with a talented prop stylist
• Catering to keep my subjects happy
• An awesome assistant to make things move smoothly and efficiently
• Extra rental gear. Lots and lots of fancy lights and crap
• A digital tech to run computers, tethering, backing up files, etc.
• Location, location fees, insurance, permits, etc.
• A producer to handle and manage all production and logistics
• A retoucher to “finish” the images… skin, color, hair, etc.
• a fancy web gallery to see everything
• There can be more but you get the idea
My honda has room in the budget for:
• Me, my eye, my time, my talent, my passion
• My gear and equipment
• Maybe one assistant
• That’s about it.
Of course I sell cars in between too. There’s a full range of cars.
But next time you have the budget for a beat-up Honda, don’t think it’s going to look like a Ferrari.

Friday, January 24, 2014

Creating Beautiful Shots using only natural lighting-No Flash (Great Tips)

For me, using flash can be the most efficient way to create a high-quality portrait. There’s nothing like it for an editorial shoot when you need that combination of full lighting control, minimal shooting time, and predictable results. Sure, you have to know what you’re doing to make it come together like that. But that ability comes with knowledge and experience. Mastering flash, means mastering your light in any situation. Sometimes, however, there is beautiful light to be found, just waiting there for you to use it. Natural and constant ambient light can be your best friends if you have a little time and flexibility with the environment and your subject.
Constant light, as opposed to flash/strobe lighting, will allow you to see and adjust its effect on your subject and the environment in real-time. This is a great way to learn about lighting placement and this knowledge and experience will certainly carry over into your flash portraiture. As I like to say, "light is light," meaning the principles of lighting a subject and their environment are essentially the same whether the light source is a quick "flash" or a constant illumination. The main difference is that the flash is capable of producing a more intense light but with too short of a duration for the photographer to see the effects of its position on the subject in real-time. With constant lighting, you can casually move the lights and your subject around and know instantly how the changes will affect the portrait you’re making. With a few test shots to check exposure, you’re good to go.

Lighting Setups

Natural Light. Window light as just about the most beautiful light you can find when the conditions are right. It can serve as a huge softbox and be manipulated with any combination of window dressings such as blinds and curtains. Simply place your subject nearby the window and let the light create much of the portrait’s drama. I like to position the subject so that there is plenty of shadow to one side, providing many options for classic portraiture looks.
_dps_ambient-techniques_001.jpg
Window light narrowed with curtains. ISO 800, 50mm, f/2.8, 1/80 sec.
Household Lights. You can also make great use of simple household lamps. I like to remove the shades off the room lights and utilize them as bare bulb light sources. To start off, just position the main light in front and to one side of your subject, preferably several inches higher than her head. This will give you a classic lighting pattern to work with. A second light may be placed farther back from the subject and serve as a back light or kicker which will add dimension.
_dps_ambient-techniques_002.jpg
Setup consisting of two household lamps, minus the lamp shades. Kicker is behind Kelly and main lamp is almost directly in front of her, just to camera right. ISO 800, 50mm, f/2.8, 1/60 sec.

Camera Settings

My general advice for any indoor shooting is to think "fast and wide." Your initial camera settings should be a balance of the highest ISO possible that will still provide acceptable noise levels for your purposes, the widest aperture your lens will allow, and the fastest workable shutter speed. Of course, each of these controls are interrelated and integral to overall exposure, so you’ll have to make some adjustments, and concessions, for the environment you’re working in and the effect you’re trying to achieve in your shots.
Fortunately, most DSLRs are now capable of low noise even when using high ISO speeds, so most room lighting and even low natural light won’t be a problem for you. But even if your camera happens to produce lots of noise at higher ISOs, that isn’t necessarily a big concern. Either leave the noise as is, or bring some of it down in post-processing using your choice of available noise reduction techniques. Many photographers are actually artificially adding noise BACK into their images in order to reproduce the look of film, or otherwise reduce the super-clean, slick, digital look coming out of the camera. Simple advice: Don’t worry about the noise unless it gets in the way of the image you’re trying to create.
Another thing that will really help with achieving beautiful portraits in lower lighting situations is a fast lens. By "fast" we’re referring to a lens with a wide aperture of at least f/2.8. The wider the aperture, the more light the lens allows to pass through in a given unit of time. This will give you more freedom with your ISO settings (as they won’t have to be so high to compensate for less light coming in through the lens), and faster shutter speeds (as they won’t have to be so low to compensate for less light coming in through the lens). Lenses with wider apertures also have the capability of shallow depth-of-field, which can greatly add to the interest and mystique of your portraiture.
Shutter speed is an important consideration not just because of its effect on overall exposure, but also because of potential blur with lower speeds. As with ISO however, the effect of supposedly less-than-optimal shutter speeds is what you make it. You might find an occasional blurry image makes a rather artistic statement. Every portrait doesn’t have to be sharp as a tack.
_dps_ambient-techniques_003.jpg
Another household light bulb setup, featuring Chris. Bare household light bulb off to camera left illuminating her on one side and the background at the same time. Main light is coming in from camera right. ISO 800, 85mm, f/1.8, 1/60 sec.
So, with those factors in mind, you might want to try the following exposure combination as a starting point and adjust according to your needs:
  • Camera Mode: Aperture Priority
  • Aperture: f/2.8 (or the widest possible for your lens)
  • ISO: 800
  • Shutter Speed (target): 1/100 sec. or higher.
In Aperture Priority mode, your camera will automatically set the shutter speed for you while you control everything else. You’ll have to pay attention to your shutter speed to make sure it isn’t falling so low as to create unwanted blurring. Again, these are just starting points. With a stationary pose and a steady hand, I’ve managed hand-held shutter speeds as low as 1/15 sec. to produce good results. You might also want to try your camera’s Manual mode to maintain full control of your settings. If your lighting conditions are going to be fairly static, I’d recommend it.
Also, you will most likely benefit from shooting in your camera’s RAW (NEF) format so critical adjustments, like white balance, exposure, and contrast can be made easily and with minimal loss of information in post-processing. Although white balance settings aren’t actually imposed on the RAW file, you can set WB as you wish during shooting in order to get an idea of what the final image might look like. Plus, a chosen WB setting will tell your RAW conversion/processing software what color temperature and tint settings to best start off with for each image.
_dps_ambient-techniques_004.jpg
Window light illuminates Satu. ISO 800, 50mm, f/4, 1/200 sec.

Post-Processing

Aside from the creative post-processing possible with your ambient light images, there are some things you might want to address in initial post:
White Balance: Not all light sources produce the same color temperatures. Despite what they look like to our eyes, the camera will record various types of household lighting (florescent, tungsten, daylight balanced) and natural light (sunset, cloudy, shade) as producing different color casts. So, if you are shooting a portrait using a bright tungsten light as your subject’s main light, but you have a strong window light coming through in the background, you might have an undesirable color mix to deal with.
Fortunately, you can correct these types of color mismatches in post-processing by making a general white balance setting choice in your software, and selectively altering the offending colors in specific parts of the image. If this isn’t something you’d like to worry about, then don’t. The colors might be acceptable just the way they are. If not, you always have artistic color altering effects and even black and white conversion options. So, it’s all good.
Noise Issues: I personally like a little noise in my images most of the time. But if you had to use very high ISO settings to get your shots, and have the need to bring some of the noise down, there are a number of good built-in, stand-alone, and plug-in software options to handle this. I will occasionally use the noise reduction tools in Lightroom or my Noise Ninja plug-in in Photoshop, for example.
Natural and ambient light photography indoors can be a great way to learn the finer points of lighting your portraits. The actual experience for you and your subject is also worlds apart from the strobe and studio effect of working with flash. Unlike outdoor shooting, indoor work without flash can introduce problems having to do with lower lighting situations. Using some to of the advice above, you should be able to handle the challenges of low-light portraiture and come away with great-looking images.

Wednesday, January 22, 2014

Need a new High Res Head Shot....


Follow us and click the Like button on our Dance Media page. Stay in touch with everything we do. Need a new High Res Head Shot, we do that, thinking video for Business or web, we do that as well. Learn more by following the link. We appreciate and follow everyone back. 416-616-7003 for details

Tuesday, January 14, 2014

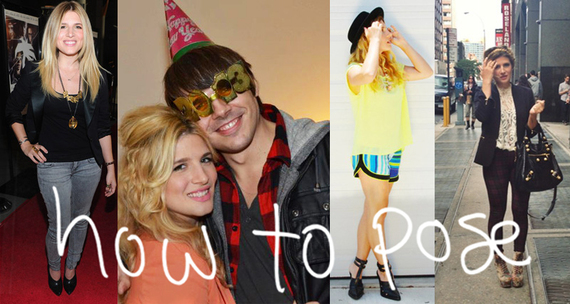
Number one question I get and sometimes a challenge to achieve is the "Pose"

2013-11-08-textcollage_featured_fortext_poses_mrkate.jpg
 Feeling like you look good in photos and finding your go-to "pose," is mostly a personal thing. Some poses may work for some people and others, not so much. The trick is to figure out your favorite moves that work for you! I used to be an actress and I learned the hard way that knowing your best angles and positions is essential because, ugh, there are some not-so-great photos out there of me posing on red carpets (please don't search engine me).
So, to answer all those posers out there, here are some of my favorite poses that will hopefully help you find a new angle on life and feel great about yourself in all those tagged Facebook photos!
2013-11-08-posing8.jpg
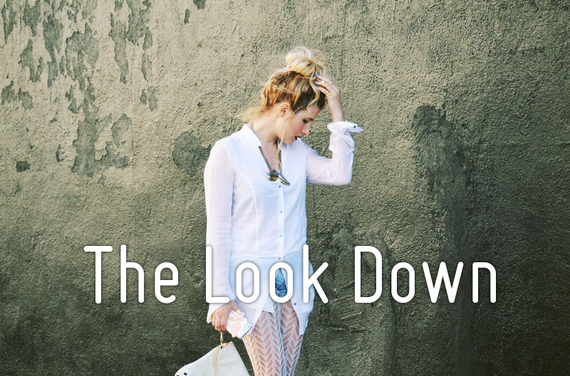
Or we could also call this "The armpit sniff" - When posing solo, I often employ The Look Down pose which makes you seem effortless for a more candid result.
2013-11-08-armtuck_posing_mrkate1.jpg
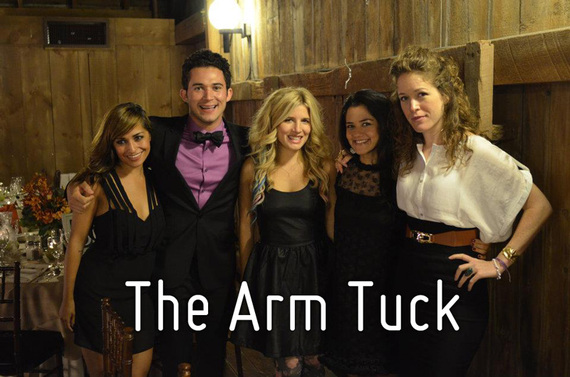
I like The Arm Tuck pose when posing in the center of a group of people. If you tuck your elbows in at your sides and angle your palms forward or hold the person's back next to you, it is always slenderizing. I also always cock my head slightly to one side. I prefer the right side of my face, do you have a favorite side? I think a slight off angle gives you more dimension and personality rather than staring straight at the camera.
2013-11-08-posing1.jpg
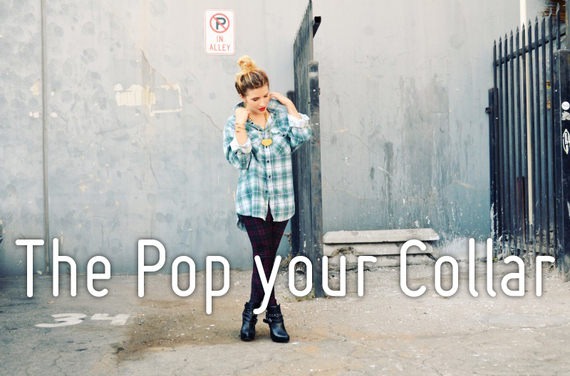
The Pop Your Collar is a great pose to look candid. Give yourself some "business" to do in the photo like adjusting your collar or pushing back a lock of hair and you'll always look effortless. Also, notice my crossed legs in the above pic, I think it is a slimming pose if you can make it look natural.
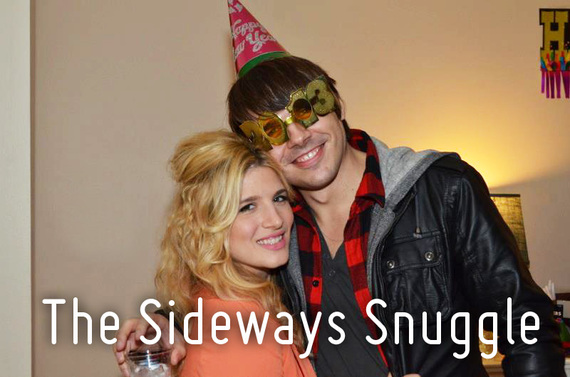
2013-11-08-sidewaysnuggle_posing_mrkate.jpg
The Sideways Snuggle is a go-to pose for me when posing with a friend or my boyfriend. Angling your body completely towards the person you are standing next to will make you look slimmer, it also allows you that side-face angle that I mentioned in The Arm Tuck. Make contact with the person's face or chest and the resulting photo will be intimate and flattering.
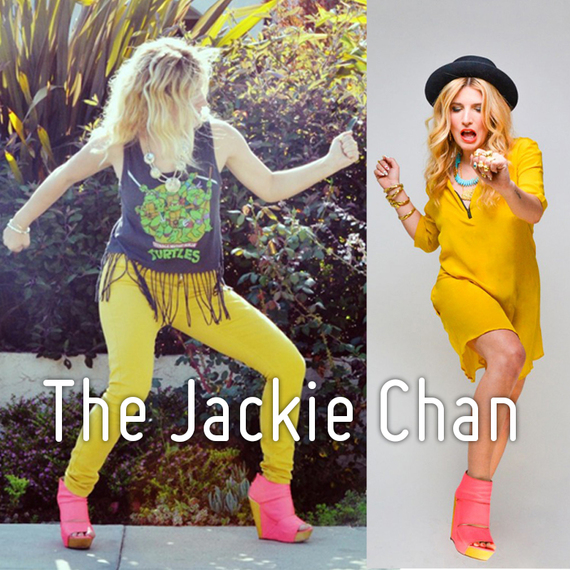
2013-11-08-posing5.jpg
Ya know, The Jackie Chan leg kick or fighting pose when you want to look playful and silly and totally badass.
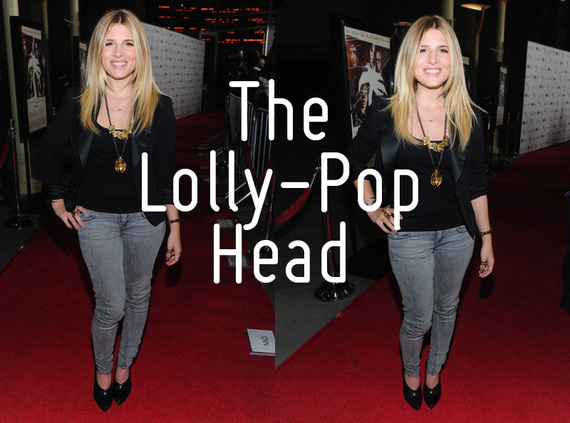
2013-11-08-burningpalms_lolly_mrkate_comp.jpg
photos via stylebistro.com
These are some of the only photos I'm okay with from the red carpet. The Lolly-Pop Head is easy to achieve when you are a petite person because almost always, the person taking the photo is taller than you! Lolly-Pop Head basically means a slightly overhead angle that makes your head look big and thus, your body look smaller. I also employed The Hand On Hip (see below) in these photos. If someone is taking a photo of you, ask them to stand on a step or angle the camera down at you and see if you like the result!
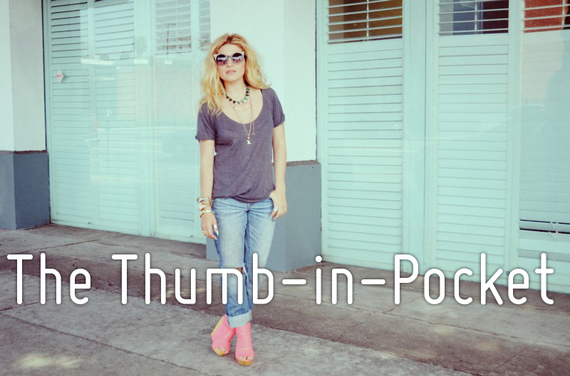
2013-11-08-posing2.jpg
A super easy pose, the Thumb In Pocket, makes you look like you're chillin' like a villain. This is an easy pose to do solo or in a group photo.
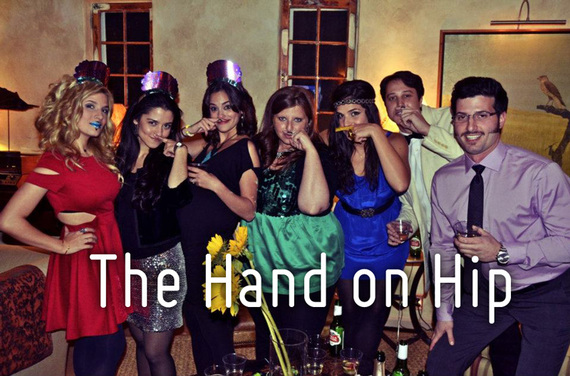
2013-11-08-handonhip_posing_mrkate_.jpg
A classic group photo pose is The Hand on Hip. This is an essential pose if you are at the end of a group photo line-up. If you don't put your hand on your hip, you risk your arm looking wider than it actually is because of the angle of the lens. Putting your hand on your hip accentuates the nip of your waist and slims your arm. I also try to angle my chin down in group photos unless I'm being a ham. Bending one knee is also a good reflex so you don't look stiff.
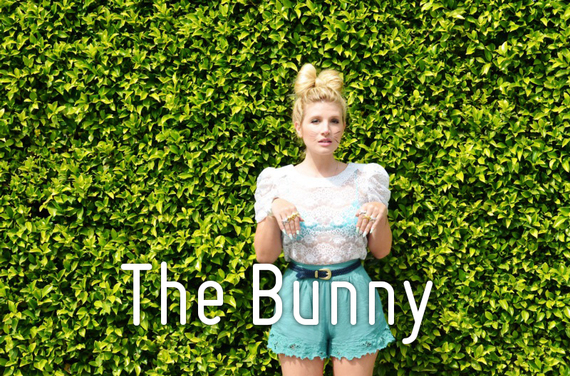
2013-11-08-posing6.jpg
Okay, maybe not so practical but The Bunny pose is funny and gives you something to do with your hands if you're feeling awkward.
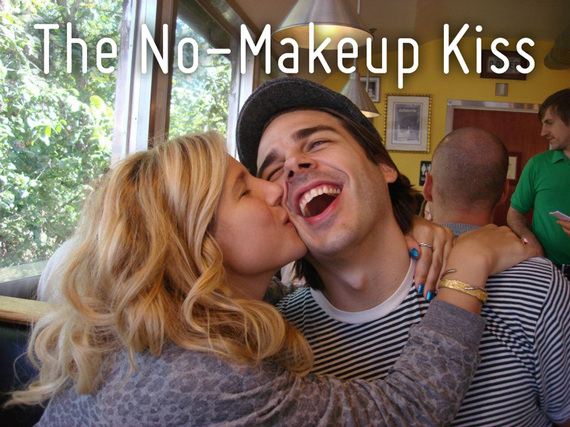
2013-11-08-nomakeupkiss_mrkate.jpg
If you have no make-up on or are just having a 'I don't want to show my face' kind of day, try The No-Makeup Kiss pose. In this picture above, I saw a photo was about to be snapped so I hid my face in a kiss! This pose will allow you to still participate in a photo-op enthusiastically but not have to feel self-concious.
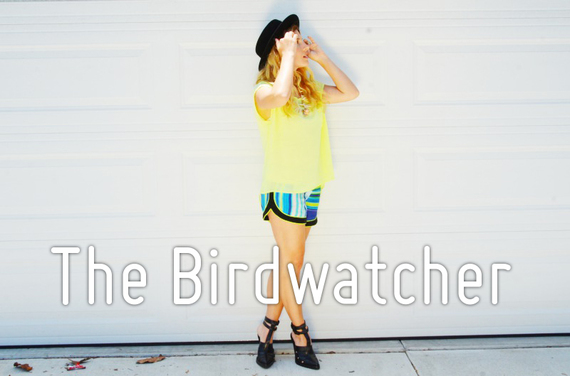
2013-11-08-posing3.jpg
Kind of like The Look Down (above), this could also be called The Look Away. The Birdwatcher is a good way to look candid and also elongate your body by bringing your hands up to your face. I was acting like I was pushing my hair back (or watching birds), but bringing your arms up makes your torso stretch and if you pose to the side and cross your legs, it is instantly slimming!
2013-11-08-posing4.jpg
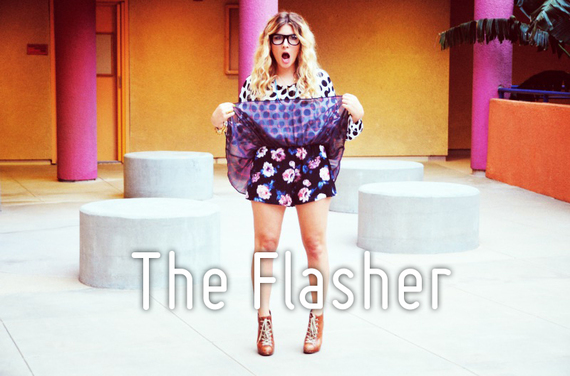
Pose at your own risk when using The Flasher. This is a silly pose that will give the photo action and humor... it's up to you if you want to be wearing a slip (or underwear) when you do Dance Mediait!
I hope these gave you some ideas for your own picture poses. Let me know what are your favorite poses or if I missed any good ones! 

Gabrielle Daleman from Newmarket was a shoe-in for the team canada

Skate Canada today nominated their 17 athletes to the Sochi Olympics, and three athletes from this are made the list.
After a solid second place in solo free skating yesterday, Gabrielle Daleman from Newmarket was a shoe-in for the team. She’s joined by ice dancing pair Alexandra Paul and Mitchell Islam from Barrie, who finished 3rd at the Canadian Championships in Ottawa.
The Canadian Team for Sochi 2014 was finalized following the 2014 Canadian Tire National Skating Championships in Ottawa. With 17 skaters, Canada has qualified the largest figure skating team of any country for Sochi 2014.
Skate Canada says the country was also the top qualifying country for the team event, which makes its Olympic debut in Sochi.
Men’s singles:
  • Patrick Chan
  • Kevin Reynolds
  • Liam Firus
Women’s singles:
  • Kaetlyn Osmond
  • Gabrielle Daleman
Pairs
  • Meagan Duhamel and Eric Radford
  • Kirsten Moore-Towers and Dylan Moscovitch
  • Paige Lawrence and Rudi Swiegers
Ice dance teams
  • Tessa Virtue and Scott Moir
  • Kaitlyn Weaver and Andrew Poje
  •  Alexandra Paul and Mitchell Islam
According to Skate Canada, these figure skaters now join 10 speed skating athletes, 10 curling athletes, 16 bobsledders, seven lugers, four skeleton athletes, 21 women's hockey players, eight biathletes, five snowboarders, 25 men's hockey players and three skiers as the next members of the Canadian Olympic Team.
Up to eight more teams will be announced between now and February. The Sochi 2014 Olympic Winter Games take place from Feb. 7 to Feb. 23.


Read more: http://barrie.ctvnews.ca/barrie-newmarket-skaters-among-17-named-to-skate-canada-olympic-team-1.1635566#ixzz2qQD2Mhl5

Wednesday, January 1, 2014

The Before, During and After the Shoot-What to Expect !

Before the photo shoot
First we need to decide where the shoot will take place. I work occasionally out of my home studio,  we can shoot on location, so the shoot could be at your home, at your favorite location, or we can discuss locations.
If you have a specific vision of what you would like your photos to look like, this is the time to let me know. If you are not sure, you can ask yourself: Who are the photos for?  Do you have a theme in mind? Do you want to evoke a certain emotion with your pictures (funny, serious, athletic, etc.)
You will also need to decide what to wear. Generally speaking, solid colors work best in portrait photography. Bold stripes and logos tend to distract from the most important subject – you! However, if you feel that polka dotted summer dress reflects your personality perfectly, by all means wear it. You may also consider changing into multiple outfits during the shoot. If there are several of you in the shoot, consider wearing something of similar color to each other. This will bring some unity to the group, perfect for family portraits.
The photo session
A typical photo shoot lasts about an hour. This amount of time is usually plenty to get a good variety of shots.
I will provide some direction during the shoot, but you are the best judge of what makes you comfortable. Feel free to bring your ideas to the session. Some of the best pictures come out of collaboration.
After the photo shoot
Within a few days (usually 3-5) after the photo shoot I will have a cd-rom for you with the best pictures from the shoot or a electronic transfer by wetransfer or dropbox. It will have five edited photos and a selection of other photos from the session.
As always, it's best to have an open conversation in all the above steps.
Steve
Dance Media Aurora Newmarket