Thursday, January 21, 2016

Welcome to Dance Media for Headshots. Check the link below for a few sample pieces and competitive pricing. The goal is to capture your best look with an unrushed service. High quality headshots should be updated annually or anytime you've changed your style or appearance. 

Dance Media covers the GTA area and suroundings, please don't hesitate to contact us through our website for booking details or any questions you may have. ex Whhat clothes to wear, hair or makeup required, location of the shoot, backgrounds or natural as there are some very key questions and decisions to be made prior to allow for a incredible experience with Dance Media.


Call on Dance Media, see just how easy we make this happen.
‪#‎GTAPhotographer‬ ‪#‎Headshots‬ ‪#‎StudioOnPaper‬ ‪#‎ProfessionalPhotos‬


Dance Media Headshots

Monday, July 6, 2015

Quick Street Photography Tips you may find useful

1.  Stop Moving

Do you treat your street photography as if you are taking a beautiful stroll through the city? There is nothing wrong with this of course, but it is very hard to walk, pay full attention and still capture quality street photos at the same time. You will often find yourself out of position when a moment happens and it is much easier to be noticed when you try to get yourself into position. Finally, people are usually moving in the opposite direction of you and so it can be tough to stop your motion enough to achieve a sharp shot while framing correctly at the same time. All of this takes a lot of coordination to pull off while moving.
The key is to slow down. Make a point to stop every few blocks and wait for a few minutes. See what happens. You want the subjects to come to you and not the other way around. Explore your surroundings in a detailed way and wait for things to unfold around you. You will be surprised at the amount of moments that will occur while you are just standing around.

2.  Pay Attention to the Eyes

If you want to improve your street photography (or portraiture) by a thousand percent then paying attention to a person’s eyes is the way to do it. People can be so skilled at hiding their emotions on their faces but their eyes will never lie. I see too many street photos with blank stares these days. Search for that hint of emotion in a person’s eyes and it will have a transformative effect on your photography.
In addition, direct eye contact can be extremely important. It creates a powerful connection with the subject. I usually try to avoid being noticed and so I often don’t aim for eye contact but sometimes waiting for a person to look at you is exactly what a photo needs.  The photograph will still be candid as long as you capture the subject in the moment that they first look at you and before they are able to react.

3.  Focus on Details

Street photography is not only about capturing crazy juxtapositions or fitting as many different people or objects into an elaborate frame. In fact, this is something that I see way too much. Often, it’s best to simplify your photos and search for the ‘little things’ – the tiny hints about life that everyone else seems to miss. Look at the details: a person’s hands, an expression, a piece of clothing, or a single object framed very close. Powerful ideas and emotions can be portrayed through the simplest of scenes.

4.  Shoot at ISO 1600

Digital cameras these days are amazingly good at high ISOs. If you are in bright sunlight or shooting still objects then you don’t need to shoot around ISO 1600, but for the rest of the time it is a good idea. I pretty much live in ISO 1600, 800 and 3200. Shooting with a high ISO will help you achieve sharper images by letting you to use a faster shutter speed and a smaller aperture, allowing for more of the scene to be sharp. As long as you are using a decent digital camera, you will quickly notice that shooting with a high ISO will create a much higher quality image, despite the extra grain.
Also, grain is beautiful! Just make sure to not brighten the exposure too much in post-production with a high ISO photo. That will ruin the photo. If you are shooting with a high ISO, exposing correctly is extremely important.

5.  Find shots without people

Street photography is often wrongly associated with being entirely about photographing people on the streets. Street photography is about people, or more specifically about human nature, but people don’t need to be present in the scene. There are an infinite amount of opportunities out there for epic street photos without people. You just have to look for them.
But let’s not confuse a street photograph without people with an urban landscape. An urban landscape is a straight shot of an urban environment, such as a simple shot of the Empire State Building. Street photos on the other hand say something about human nature. They have a message to them. Take the example of Layers of the City. This photograph represents the changing nature of Manhattan and particularly the neighborhood of the East Village, which is currently the fastest gentrifying neighborhood in the city. It portrays the progression from the seedy underbelly of the neighborhood to a sleek and sterile future. The shot says something about human nature and the nature of cities. It is not just a straight shot of a construction site.

6.   Shoot at Night with Artificial Light

Night is one of the most fun and rewarding times to shoot on the street. In general, I find street photos at night to be more moody and powerful than their counterparts taken during the day. And you don’t need to use a flash (although I do enjoy the flash look). I prefer to shoot without a flash because I love the colored and authentic look of artificial light sources and I want to take advantage of the beautiful qualities of these lights.
The trick to shooting street photography at night without a flash is to find bright areas and wait there (and shoot at ISO 1600 or 3200). Use glowing storefront signs and hang out near streetlamps. It will be worth it.

7.   Like A Fine Wine

Street photography is like wine; it ages extremely well. This idea is something that you need to pay attention to when out shooting. Think about what is going to change. Focus on current trends or things that won’t be around in 2, 3, 10 or 20 years. For example, take a look at this 2012 shot of five people reading paper on the subway. This is not my favorite image by any means but it is going to age well extremely quickly. In 3 years, capturing an image like this may be impossible when almost everyone is using e-readers or their phones. This idea makes this image much more fascinating to me.
And this is only a small sample. The exciting thing about street photography is that for each of these seven “secrets,” there are dozens more. What other tips and tricks do you use to improve your street photography.

Hope these tips are useful and remember, just keep experimenting and clicking away.

Friday, April 24, 2015

How to Shoot Better Landscape Photography

Hands down, the number one question is how to make better landscape images. Many fall into the new-gear trap thinking that when I upgrade to some new DSLR then I’ll be able to take better pictures. They buy the gear and suddenly the wind drops from their sails and their images still lack impact. So let’s talk about some things you can do to make your landscape photos pop.

1. Fanatically Chase the Best Light

What is good light you say? There is really no such thing as bad light, but it’s hard to create images with impact during the middle of the day when the sun is high. Midday the sun is harsh and it washes out colors and texture with heavy dark shadows.
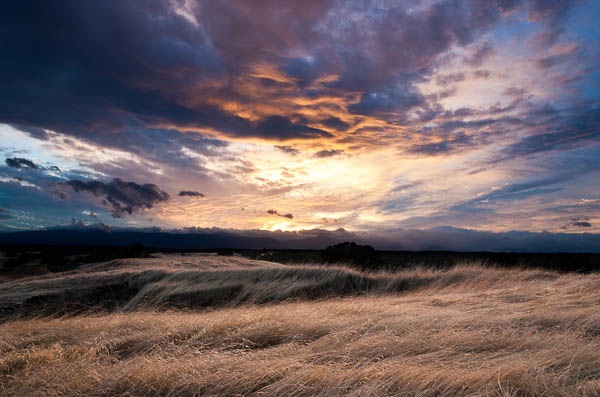
The best time to get out and shoot everyday is when the sun is low in the sky because it creates more interesting side lighting that gives the subject more depth and scale. The light is much warmer creating softer highlights with better texture detail. This low warm light is also near sunrise and sunset and those are obvious times to add amazing colors to a landscape.
Autumn Sunset (Lost Memory).jpg
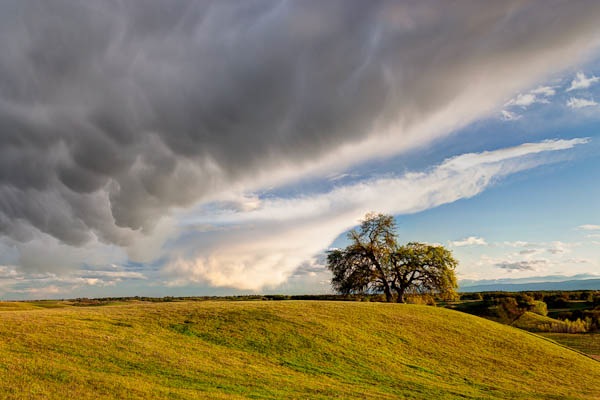
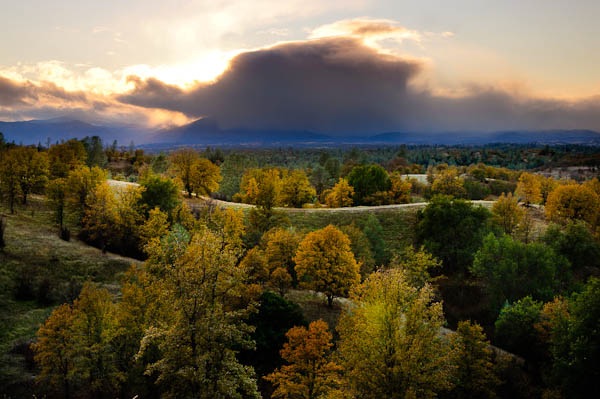
Another great place to look for amazing light is at the edges of storms. When a storm is passing through, the clouds can break up allowing the sun to peek through creating very dramatic scenes with well lit foregrounds against a dark sky. The air is clear and the ground is wet reflecting more of the colorful light from the sun. These kinds of storms move quickly and the light can change in a moment, so you have to be ready.
Mamutus Clouds over Red Bluff.jpg
Shooting during off hours of the day is tough because those are very anti-social times. The first part of the day just after sunrise is really early and most of us still have to work five days a week. In the evening, the best light is going down right when dinner is served and it’s hard to leave your family behind and return to eat your dinner cold.

2. Don’t be Lazy

Getting good light in a landscape shot is the same difference between shooting a model with and without makeup. You have to work to get to these locations early in the morning and late in evening. At sunrise, that means hiking out in the dark to get on location to catch sunrise. That means flash lights, an extra layer of clothing and a stiff brew of coffee to keep you awake through the wee hours of the morning.
Patience is also key. You might be hiking during the day and find the best view looking down Yosemite Valley but it’s midday and the light sucks. To get this shot you need the fortitude to sit there half the day for the sun to get low and possibly put up a nice sunset for you. The light may not do what you want, so are you willing to stay another day to try again? If you do, your shot won’t be just another Tunnel View.

3. Know Your Landscapes

There is this odd grass is greener somewhere else mindset all of us fall into. We believe we have to travel somewhere to get a great landscape shot. The truth is, you know your area like the back of your hand and if you don’t, get in your car and explore. A vast majority of my best images were all taken within 75 miles of my home. Keep in mind that the whole world doesn’t get to look at your countryside daily. So when it’s boring and repetitive for you, it’s always new and exciting for your admirers.
Immersion - Brandy Creek.jpg
When travelling, do your research before you get there. Google Earth is my number one go-to app for researching locations. You can go a step further and use The Photographers Ephemeris which plots where the sun and moon will rise and set. This is a lifesaver for knowing when the sun will hit a peak and from what angle. I can find out when the sun will go down behind a ridgeline to shoot a waterfall. Being armed with this research will dramatically boost the number of keepers and and your fans will think you’re a rockstar.

4. Don’t be a Chicken

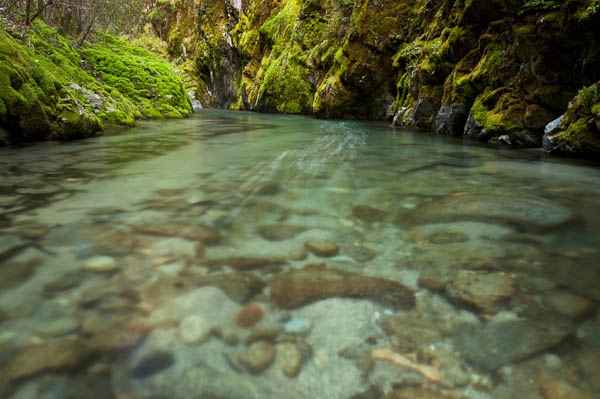
Have you ever gotten to an awesome landscape and failed to get the shot because you didn’t cross a creek or you didn’t want to lay down in the mud to get an awesome new perspective. Often times changing our point of view can completely change a composition. I’m not suggesting you do anything dangerous, only you try pushing yourself beyond your typical comfort zone to really work for that shot. When I shoot moving water, inevitably, you will find me standing in the middle of the creek so I pack waders with me to stay dry.
landscapes with impact.jpeg
Perhaps to get a clear view of a rainbow you need to get down on the ground and lay in some mud to see around some brush. If you have a fear of the dark, make steps to work past that fear so you can stay out past blue hour and not be afraid to walk back to your car in the dark with a flashlight. Perhaps the mosquitoes are acting like Africanized Bees. Be prepared with bug spray and swat a few so you can get the shot regardless. Landscape photography is often uncomfortable, slightly dangerous and downright boring, but if you’re willing to work past these challenges, the results will create incredible impact.

5. Use Different Focal Lengths

For most people, when they think of a landscape, they think of big expanses shot using a wide-angle lense. Try something different by shooting with longer focal lengths. This allows you to really focus in on specific details. You can see past all the distractions and you get to give the best part of the scene the whole stage.
Autumn Oaks (Potpourri).jpg
Wide-angle tends to make distant objects like mountain peaks feel distant and small. Telephotos will bring that peak in close and will compress all the objects together making them feel bigger and giving them a much greater impact.
You can still get great impact shooting wide. Many incorrectly believe that wide angle lenses are good for “getting it all in”. The opposite is true. Since you can get more in the shot, it allows you to get much closer to the subject filling the frame with more of what you want having fewer distractions.

Final Words

If you struggle with creating dull and insignificant images, the recurring theme through all of these tips is simply to do something new that you’re aren’t doing now. Growing your craft is not a 5-step checklist, it’s a process that takes time. Get out of your computer chair and experiment, keep making mistakes, and don’t forget to have fun! For me each new image is the thrill of the hunt. I love to seek the unknown and share it with the world. Images created by overcoming the biggest hurdles with the most blood, sweat and tears always move people the most.

Friday, March 27, 2015

Fundraiser for the Seasons Centre for Grieving Children

March's Giveback from Dance Media Dance Media

"Glam It Up Barrie" on Facebook

"Acts of Kindness"

This past weekend Dance Media had the opportunity to get involved with a fundraising event in Barrie Ontario held at the Army Air force, Navy & Marines Club called "Glam It Up Barrie" created and lead by Shakir Barmare to support the Season's Centre for Grieving Children. Shakir, the main organizer of the event which is driven by volunteers, brings together hair and makeup artists along with professional photographers to create a one day "Glam" session for all the attendees whom purchased a ticket to raise funds and awareness of the Centre. In return, the volunteers have an opportunity to not only show off their skill to their clients but to network with other artists and build their brand identity as well. Typically a photographer requires a hair and makeup artists for their customer... 

What is "Glam It Up Barrie" you may ask?

Glam It Up Barrie now in its second year is a community driven fundraising event all to support the Seasons Centre for Grieving Children, a non profit organization located in Barrie which relies on events just like this one. Tickets are purchased on-line as well as at the door with proceeds going to the Centre. 

It was a long but very humbled day for us as we were out the door at 8am and would spend the next 8 hours capturing perfectly prepared individuals not returning until 8:30pm.

Below is some info about the Centre and the amazing work they continue to do for the kids and there families since 1995. 


Since 1995, Seasons Centre for Grieving Children has been providing peer to peer support for children between the ages of 4 and 24 years who are grieving the death or life threatening illness of an immediate family member. The Centre is founded on the belief that every child deserves the opportunity to grieve in a supportive and understanding environment,
There are no fees for our services. Children are able to attend programs regardless of their family’s financial situation. Seasons Centre for Grieving Children receives no government funding and relies on the generous support of our community 

Thank you to all the individuals involved for making this day so special to be a part of and to the Seasons Centre, thank you for being there for our community. Be sure to get involved next year and attend this event and show your support and we'll capture you in the spotlight and "Glam On".

Thank you
Stephen Plumley
Dance Media Ltd Image Library from our day Click to view our Photo library from the event

Thursday, December 11, 2014

Taking Long Exposures

It seems to me that we live in a world orientated to a digital generation demanding instant gratification. This extends to photography, encouraged by the prevalence of camera phones and Instagram type apps. How many photographers, when they come across a beautiful scene, just stop and snap a photo with a camera phone and then move on?
Long exposure photography is different. It demands patience, an appreciation of beautiful light and a deep understanding of composition. It is as much about the mind-set of the photographer as it is about the subject. It’s not brash or flashy – you rarely see long exposure photographers use techniques such as high dynamic range (HDR) photography or adding texture layers.
What is long exposure photography? There is no precise definition. I think of it as involving shutter speeds of ten seconds or longer, but I’m sure some photographers will be thinking in terms of shutter speeds of a minute or more. But the aim is the same – to create beautiful and surreal images by leaving the shutter open long enough to record anything that moves within the landscape, such as water, as a blur.
That’s why most long exposure photography tends to take place along the coast or near moving water. It creates an interesting subject, helped by natural features such as rocks and islands, and man-made ones like piers and jetties.
Painting with light is also a form of long exposure photography.


Tuesday, December 2, 2014

It's all about the focus, learn it and apply it !

All pictures of people soar when you focus in on your subject’s eyes, and that’s no different with Christmas photos. It’s critical to compose the image with as little headroom and dead space on the sides as possible, so the image is more about the faces and the eyes than anything else. The rest of the décor will filter into the image on its own. In our photographs, always try and nail the eyes to be on the same plane, and this is effective for this kind of photo as it shows a subtle unity among family or group shots. 
You should always use a flash with most indoor Christmas photos, but use a detachable flash (or an angled flash) and bounce the light off the ceiling or walls and don't be afraid to review your picture and then re set it. Remember, the ambient light levels will be raised by the Christmas lights (and possibly candles too), and you don’t want the vibrant colors washed out by the flash. And as always, don't miss those special moments and get in the picture yourself if it's your family picture, have a tripod handy and a remote trigger and don't take just one as kids can be the hardest to capture the right expression and the eyes.

Steve
Dance Media Ltd

Thursday, May 22, 2014

We've all seen these shooters !

Just read on Facebook the other day how the social networking site has suddenly turned into a magazine – poets, writers and photographers after every few posts. While it is a great thing to share your creativity with everyone, some people just do not know where to stop. For instance, budding photographers who, no matter their age or location, always do these 11 annoying things on Facebook.

1.Tag 50 people in one photo to get likes and comments.

So you get a notification about being tagged in your friend’s photo – and you click on it to find dozens of other people being tagged in it too, which is essentially some random shot of a bird or flowers or something equally lame. You give one sympathy like, untag yourself and move on. This is a warning sign that your friend is going to go into the amateur photographer mode soon.

2.Create a “XYZ Photography” page on Facebook.

The most common annoying thing photographers on Facebook do is to create a photography page in their own name on Facebook. Even if they had probably just started out fresh and taken up the art as a hobby. With 50 average pictures in their computer to boast of. Sigh! Or they stand in a room full of people and can't stop shutter bugging, literally by taking a rapid fire barrage approach of 10 pics and just maybe their hoping for 1 decent one of each person.

3.Hound every person they know to like the page.

This is the most annoying part of having an amateur photographer for a friend. It does not matter if you guys have not spoken in years, they are going to pop up on your chat and be like, “Hey! What’s up? Please like my page “Douchebag Photography”… thanks! : - )” And they are not going to rest till you do it. So just get it done and over with!

4.Hound every person they know to tell their friends to like the page.

The next level of douchebaggery comes with them getting in touch with you once again. You’ve already ‘liked’ their page, but no – that’s not enough. Could you also please-pretty-please spread the word to the people in your friend list too? Of course, why not? Why don’t you effing pay me a salary for being your public relations officer?

5.Create a fancy watermark and post it on every picture.

Because they are so effing brilliant, magazines and other photographers are dying to get their hands on these works of art. At least that’s what these shutterbugs think. How to avoid such theft? Put more effort into creating a watermark than they do in mastering their photography skills – and paste them on every effing photo. The least it does is give these poor souls a sense of achievement.

6.Upload at least one ‘artistic’ selfie for a profile picture.

Every wannabe photographer has at least one profile picture they have taken of themselves – a DSLR selfie, if you must. This is to do two things – one, show the world that they have a fancy camera, and secondly, show the world that they can use it to take their own pictures too!

7.Think that pictures of poor/old people in black and white are the epitome of great photography.

Amateur Photography Lesson 101: If you have not taken high contrast photos of tired, wrinkled and depressed old/poor people in black and white, you have not done anything worthwhile with your expensive camera. Every wannabe shutterbug will have at least one photo of such a subject in their extensive albums.

8.Think that macro is just the bee’s knees. Literally.

Amateur Photography Lesson 102: Macro the shit out of all the bugs in and around your location. Butterflies, caterpillars, bees – any and every insect become subjects of this budding lensman’s camera. If bugs could talk, they’d probably be saying…

9.Edit the shit out of the simplest pictures.

Amateur Photography Lesson 103: Take a picture, Photoshop it till it barely looks like the original and take all the credit for some amazing photography skills. What is up with THAT? They really need to calm down and go easy with the editing tools.

10.Overthink their captions.

So you take a picture of a line of ants scurrying away – and give a 300 word exposition on hard work and discipline as the caption? Really? They are ants – taking their food back to their anthill. That’s it. Don’t overthink it – it comes off as incredibly pretentious, dude.

11.   Flood your newsfeed with pictures.

Remember #2 and #3? This will lead to a chain reaction – and before you know it, your newsfeed is flooded with photos of the aforementioned “Douchebag Photography” that you were not even interested in to begin with. Open your Facebook and you are like –

The remedy? Unlike their page, unfriend them, block them – or do something more permanent than that… to their precious camera.